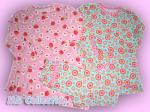
 Zwei Schlafis Zwei Schlafis
Kommentare: 6 Marion25
|
 |
 |
Description for sleeping bag


| Description for sleeping bag |
| Beschreibung: |
This description makes a sleeping bag for a 40 cm doll. Scale to fit other sized dolls.
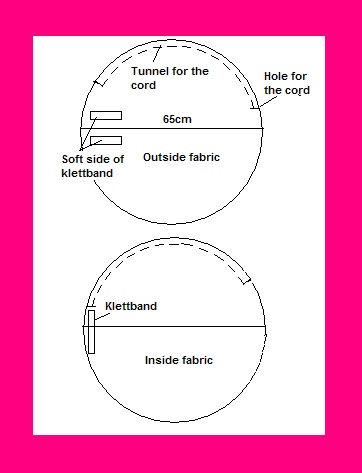
1. Cut the two circles in your choise of fabric, if you use two thin cotton fabrics you should also add a layer of batting. Make sure to make markings for the button hole(make the marking on both pieces!!!) and use these to place the two pieces correctly when you sew them together
2. Sew the velcro (klettband) on the two pieces(wrap the fabric around the doll to get the positions right) and add any decorations. Make a button hole in the outer fabric for the cord. The length of the velcro on the inside fabric should be app. 7 cm and spaced app. 10 cm apart. The length of the velcro on the outer fabric should be long enough to cover the inside velcro pieces.
3. Put the two pieces together face to face, sew(remember to leave a small hole for turning).(You could put the cord in now, but you'll have to be very careful not to sew in it when you make the stiching on the outside). Turn. Close the hole.
4. Sew a stiching all the way around the circle. Push a piece of cord into the tunnel created by the stitching, push it all the way around to the marking, sew a few stiches to fasten the cord.
5. Wrap around doll.
6. DONE!!!
Best Regards
Bettina
Carina, perhaps you could translate this? |
| Datum: |
{<} |
| Hinzugefügt von: |
ernholtnielsen |
| Bild als unagemessen melden |
|
| Autor: |
Kommentar: |
The description is perfect!
Liebe Grüße, Barbara |
...and thanks for the drawing, for me it is much helpful!
-----------------------------------------------------
Anleitung Puppenschlafsack:
Die Maße in der Beschreibung beziehen sich auf einen Schlafsack für eine 40cm große Puppe und müssen ggf. an die Größe Eurer Puppe angepasst werden.
* Zwei Kreise (Stoffe nach Wahl) zuschneiden (- In einem anderen Post schlug Bettina ca. 65cm Durchmesser für ein Neugeborenes vor). Bei Verwendung dünner Baumwollstoffe auch eine Lage Futter (z.B. Wattevlies) zuschneiden.
* Auf beiden Teilen eine Markierung für das Knopfloch anbringen; auf beiden Teilen, da die Markierung auch als Passzeichen beim Zusammennähen dient
*Das Klettband auf beide Kreise aufnähen. Dazu den Stoff einmal um die Puppe wickeln, um die korrekte Position zu ermitteln. Die Klettstreifen auf der Futterseite sollten etwa 7cm lang sein und 10 cm auseinanderliegen; das Gegenstück auf der Aussenseite sollte lang genug sein, beide Klettstreifen zu erfassen.
* Ggf. Verzierungen aufnähen.
* Am Aussenstoff an der markierten Stelle ein Knopfloch für die Kordel nähen;
* beide Kreise r.a.r. aufeinandernähen. Dabei eine kleine Wendeöffnung lassen.
(Die Kordel könnte bereits jetzt eingezogen werden, allerdings müsste man dann beim Absteppen sehr vorsichtig sein, die Kordel nicht mitzufassen.)
* Wenden. Wendeöffnung schließen.
* Rundum absteppen. Durch den so entstandenen Tunnel bis zur Markierung ein Stück Kordel einziehen; an der markierten Stelle feststeppen.
Fertig!
-----------------------------------------------------------
Ich hoffe, ihr versteht mich :)
LG, Carina |
Thanks again!! Tonight i make such a cute bag and it was very easy and quickly to sew.
Best regards and merry christmas,
Tamani |
you can use this idea, I hope to see a lot of cute sleeping bags.
Carina, thank you so much for the translation, it would have taken me a very long time to write it in German, and the outcome wouldn't have been very good :-)
Best Regards
Bettina |
The sleeping bag is a perfect present for little girls an boys who want to keep their dolls or animals warm and cozy! Thank you for sharing this idea with us and thank you again for that perfect description. I will try to finish some sleeping bags for christmas!
Many greetings
Karen |
thanks - thanks - thanks
the perfect present for ma doughter
mg
marina |
|
|
 |